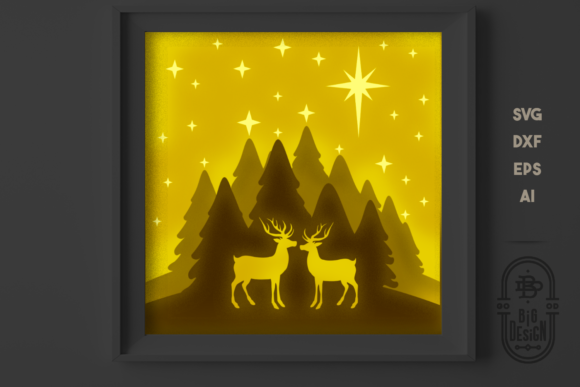
3D Christmas Reindeer Shadow Box: A Practical Guide to Getting Your Digital Cut Files Right
The holiday season is approaching, and the demand for unique, high-quality decorations has never been higher. Whether you are a seasoned crafter with a Cricut or Silhouette machine, or a small business owner looking to scale your handmade shop, the 3D Christmas Reindeer Shadow Box offers a compelling solution. This specific design, often referred to as a Christmas SVG 3D Scene Reindeer, transforms flat digital files into dimensional art that adds depth and charm to any mantel or window display.
However, purchasing a digital file is only the first step. The gap between a beautiful preview image and a finished physical product often lies in how well you understand the file structure and the assembly process. Many creators rush through the download phase, assuming all files work identically across different software platforms. This oversight can lead to wasted material, frustrated hours of troubleshooting, and ultimately, a disappointing final result. To ensure your project succeeds, it is crucial to approach this digital asset with a clear understanding of what you are buying and how to utilize it effectively.
Understanding What You Are Actually Buying
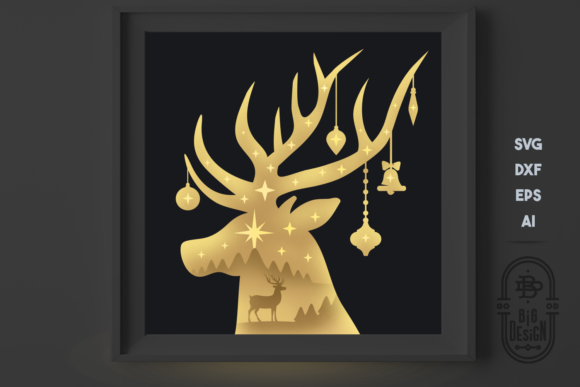
Before you click "download," you must recognize that you are not receiving a physical object. This listing is for a DIGITAL DOWNLOAD containing a ZIP file with multiple vector formats. Specifically, the package includes one SVG file, one DXF file, one EPS file, and one AI file. Each format serves a distinct purpose depending on the software and hardware you intend to use.
A common misunderstanding among beginners is assuming that an SVG file will open perfectly in every cutting machine software. While SVGs are widely compatible, they sometimes require specific settings within software like Cricut Design Space or Brother ScanNCut. If you are using professional design tools like Adobe Illustrator or CorelDRAW, the AI and EPS files are your best bet for precise editing before sending the design to your cutter. Ignoring these distinctions can result in missing layers or distorted lines when you attempt to cut.
Furthermore, the default size of this design is listed as 8x8 inches. While this is a standard dimension for many projects, it does not mean the file cannot be resized. However, resizing complex multi-layer designs requires caution. If you stretch the layers unevenly, the alignment required for the 3D effect will be lost. Always check your software's scaling tools to ensure the aspect ratio remains locked if you need to adjust the dimensions for a larger frame or a smaller card.
Navigating the Layers: The Key to the 3D Effect
The magic of the Christmas SVG 3D Scene Reindeer lies in its construction. As noted in the product details, this scene consists of 4 layers. This is a critical detail that separates a simple silhouette from a true shadow box effect. When you import the file, you should see these layers separated clearly. If your software merges them into a single shape immediately upon import, you have likely missed a setting or used a conversion tool incorrectly.
To achieve the desired depth, each layer must be cut from a different material or color. For instance, the background might be dark wood, the second layer a lighter shade of brown, the third a vibrant red, and the fourth a crisp white for the snow or antlers. If you fail to separate these layers during the cutting process, you will end up with a flat, two-dimensional image that lacks the visual pop intended by the designer. This mistake not only ruins the aesthetic but also wastes time and materials trying to salvage a project that was set up incorrectly from the start.
Another frequent error involves the order of assembly. In a 3D shadow box, the sequence matters immensely. If you glue the front layers before securing the back base, the entire structure may collapse or look misaligned. It is highly advisable to dry-fit the pieces—placing them together without adhesive—to verify that the layers stack correctly and that the spacing creates the illusion of depth you desire. This simple step can save you from having to peel apart glued layers later.
Selecting the Right Software and Tools
One of the most significant pitfalls for entrepreneurs and hobbyists alike is underestimating the software requirements. The prompt explicitly states: Be sure to have the correct software for opening and using these types of files. If you do not own a vector graphics editor, you may find yourself unable to edit the AI or EPS files. Similarly, while SVG files are versatile, some older versions of cutting software struggle with complex nested paths found in 3D scenes.
If you are a small business owner planning to sell products made from this design, you must also consider licensing terms. Even though this is a digital download, commercial usage rights vary by creator. Using a personal license to manufacture items for sale can lead to legal issues and account bans on marketplaces like Etsy or Amazon Handmade. Always read the fine print regarding commercial rights before mass-producing items.
For those using laser cutters, the DXF file is essential. Unlike SVG files which are optimized for blade cutters, DXF files are structured differently for laser engraving and cutting machines. Attempting to force an SVG into a laser cutter interface without proper conversion can result in incorrect line weights or failed cuts. Conversely, using a DXF file on a vinyl cutter might cause errors if the path data is not recognized correctly. Matching the file type to the machine is non-negotiable for professional results.
Evaluating Quality Before You Commit
When evaluating a 3D Christmas Reindeer Shadow Box file, look beyond the preview image. Check the complexity of the layers. Sometimes, files labeled as "simple" actually contain hundreds of tiny, unnecessary nodes that can crash your software or slow down your cutting process significantly. A clean file with organized groups and named layers indicates a professional product that will be easier to work with.
Additionally, consider the materials you plan to use. A 3D scene works best with materials that have good structural integrity, such as chipboard, balsa wood, or thick cardstock. Thin paper may not hold the layers apart effectively, causing the shadow box to look collapsed rather than dimensional. If you choose a material that is too flimsy, the finished piece may warp over time, especially if displayed in a warm room near a fireplace.
Finally, think about your production workflow. If you are creating this item for a holiday craft fair, you need to know how long the cutting and assembly process takes. A 4-layer design requires four separate cuts (or at least four separate passes) plus the assembly time. Underestimating this time can lead to stress and missed deadlines. Plan your schedule accordingly, allowing extra time for testing a prototype before committing to a full batch.
By taking the time to understand the file formats, respecting the layer structure, and choosing the right tools, you can transform a simple digital download into a stunning centerpiece. Avoid the common traps of rushing the setup or ignoring the technical specifications. With careful preparation, your Christmas SVG 3D Scene Reindeer project will not only meet your expectations but exceed them, delivering a festive masterpiece that captures the spirit of the season.